Hooping is one of those skills that looks simple but makes ALL the difference between a professional embroidery result and a disappointing one.
When I first started embroidering, I didn’t pay enough attention to hooping — and my results showed it. Puckered fabric, misaligned designs, hoop marks on garments… sound familiar?
After two years of professional machine embroidery on my two Melco EMT16x commercial machines, I’ve hooped hundreds of t-shirts and sweatshirts. Today I’m sharing exactly how to hoop a T-shirt for machine embroidery, including the tools that changed everything for me.
Watch me do it in real time first:
Why Hooping Matters So Much
Your embroidery design is only as good as your hooping. Here’s what bad hooping causes:
- Puckering and pulling of fabric around the design
- Misaligned or off-center designs
- Hoop burn marks on your garment
- Stitches sinking into fabric
- Distorted lettering
Getting your hooping right eliminates almost all of these problems instantly.
What You’ll Need
Before we start, gather these supplies:
- Your t-shirt or garment
- Cutaway stabilizer (backing) — I use this for all knit fabrics including t-shirts
- Water soluble topping — essential for t-shirts to prevent stitches sinking
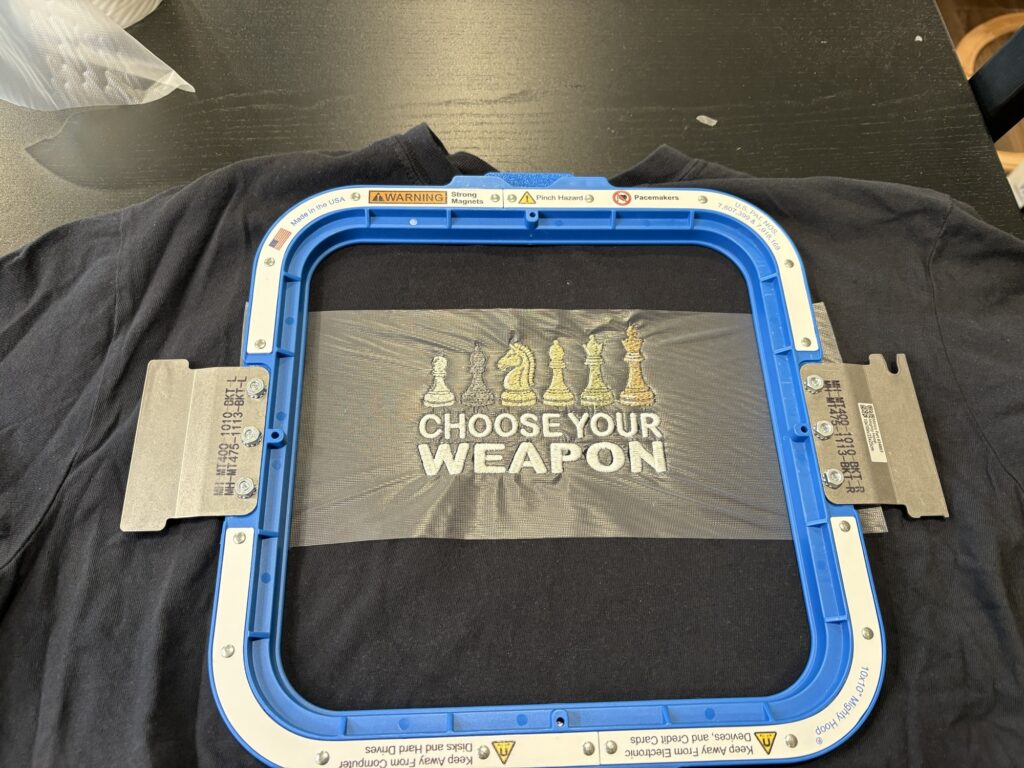
- Mighty Hoop magnetic embroidery hoop — my absolute favourite for t-shirts
- Temporary adhesive spray — optional but helpful
- Your embroidery machine — if you don’t have one, you can get one from here, a lot of options!
Why I Use Mighty Hoops for T-Shirts
Before I explain the steps, let me tell you why I switched from regular plastic hoops to Mighty Hoops for t-shirts and never looked back.
Regular plastic hoops clamp the fabric between two rings. This works fine for stable woven fabrics but causes problems with stretchy knit fabrics like t-shirts:
- The clamping can distort and stretch the fabric
- Hoop burn marks are very common
- Re-hooping is frustrating and time consuming
Mighty Hoops use powerful magnets instead of clamping. The fabric sits naturally without being stretched or distorted. The result? No hoop marks, no distortion, and perfectly hooped garments every time.
Another bonus: Mighty Hoops are heavier than regular hoops, which actually makes them easier to handle. Once you’ve placed the bottom frame inside the layers of the t-shirt, the weight keeps it stable while you position the backing — no more fumbling around trying to hold everything in place at once.
For t-shirts specifically — Mighty Hoops are worth every penny.
Step by Step — How to Hoop Your T-Shirt
Step 1 — Prepare Your Backing
A lot of people tell you to cut your cutaway stabilizer slightly larger than your hoop size. Well, I started with that advice and ended up trimming away a lot of backing. It’s a big waste! I then always cut mine about an inch larger than the design on the top and bottom and make sure the two sides extend just past the hoop edges so it’s fully supported. If you’re reusing a piece of backing left over from a previous project and it’s smaller than your hoop, use the temporary adhesive spray to keep it in place.
For t-shirts always use cutaway stabilizer — not tearaway. T-shirts are stretchy knit fabric and need the permanent support that cutaway provides. Tearaway will leave your design unsupported and it will stretch and distort over time.
Step 2 — Prepare Your Topping
Cut a piece of water soluble topping roughly the same size as your backing — you don’t need to go larger since it dissolves anyway. I keep three widths on hand to match different design sizes: 5″, 8″, and 10″. This goes on TOP of the t-shirt during embroidery and dissolves completely when you dampen it after stitching.
Why do you need topping on a t-shirt? T-shirt fabric has a slight texture and the stitches can sink down into the fibres. Topping creates a smooth surface for the stitches to sit on top of, giving you crisp clean results.
Step 3 — Position Your T-Shirt
Lay your t-shirt flat on your work surface. Smooth out any wrinkles — this is important! Any wrinkles in the fabric will be locked in place once you hoop.
Decide exactly where you want your design to sit. I usually place the bottom frame on the front layer first to visualize the placement — this makes it much easier to position the backing correctly once the bottom frame is tucked between the two layers of the t-shirt.
Step 4 — Place the Bottom Magnetic Frame
Slide the bottom frame of your Mighty Hoop between the two layers of the t-shirt. Since the top layer covers the hoop, you won’t be able to see it clearly — but you can feel exactly where it sits. Lay your cutaway stabilizer on top, making sure both sides extend over the edges of the hoop and fully cover the embroidery area.
Useful tip: When embroidering a center chest design, align the center notch with the neck hole to make sure your design is perfectly centered.
Step 5 — Apply Topping
Place your water soluble topping on top of the t-shirt, centered over the embroidery area. You don’t need to secure it — the magnet will hold everything in place.
Step 6 — Apply the Top Magnetic Frame
This is where the magic happens! Simply place the top magnetic frame over the bottom frame. The powerful magnets snap together and grip the fabric sandwich firmly — stabilizer, t-shirt and topping all held perfectly in place.
No wrestling with rings, no stretching, no fussing. Just snap and go!
⚠️ Tip: Use two hands to hold the top frame and lower it evenly over the bottom frame. The magnets are extremely strong — if you drop one side, they can pull the bottom frame out of position or snap shut suddenly and pinch your fingers. It really hurts!
Step 7 — Check Your Placement
Before attaching to the machine, double check:
- Is the fabric smooth with no wrinkles?
- Is your placement mark centered?
- Is the fabric taut but not stretched?
- Is the topping fully covering the embroidery area?
Step 8 — Attach to Your Machine
Attach the hoop to your machine’s hoop arm. Use the trace function to confirm the design placement before starting.
Make sure only the front layer gets hooped — never the back!
Step 9 — Stitch It Out!
Press start and let your machine do the work! Stay nearby in case of thread breaks or a bobbin running out.
Step 10 — Remove and Finish
Once stitching is complete:
- Remove hoop from machine
- Separate the magnetic frames
- Remove t-shirt from stabilizer carefully
- Dampen the topping to dissolve it — or it will tear away easily on many types
- Trim any jump stitches with small embroidery scissors
- Press lightly with iron if needed using a pressing cloth
This video shows the finishing on a sweatshirt but the steps are the same for T-shirts.
Common Hooping Mistakes to Avoid
Mistake 1 — Using Tearaway Stabilizer on T-Shirts Always use cutaway on stretchy knit fabrics. Tearaway doesn’t provide enough long term support.
Mistake 2 — Skipping the Topping On t-shirts especially, skipping topping results in stitches sinking into the fabric. Always use it!
Mistake 3 — Hooping Too Tight Stretching the fabric while hooping distorts the design. The fabric should be taut but not stretched.
Mistake 4 — Ignoring Wrinkles Any wrinkle in the fabric before hooping becomes a permanent feature in the finished embroidery. Always smooth your fabric completely before hooping.
Mistake 5 — Wrong Hoop Size Use a hoop that’s just slightly larger than your design. Too large and the fabric may shift. Too small and your design won’t fit!
My Recommended Products
- Mighty Hoops — worth every penny for t-shirts
- Cutaway stabilizer — available from most embroidery suppliers
- Water soluble topping — available from most embroidery suppliers
- Melco EMT16x — my machine of choice (commercial). If you just need a personal one for your hobby, you can pick one from here.
Watch the Full Tutorial
Don’t forget to watch my step by step video above where I show you exactly how I hoop a t-shirt on my Melco machine! If you found this helpful please subscribe to my YouTube channel for more embroidery tutorials every week.
📺 YouTube: youtube.com/@TheEmbroideryNookVancity
Want More Free Embroidery Tips?
Subscribe to The Embroidery Nook newsletter and get a free embroidery design delivered to your inbox every month!
With love and stitches,
Tiffany
Vancouver, BC, Canada
Disclosure: This post contains affiliate links. If you purchase through my links, I may earn a small commission at no extra cost to you. I only recommend products I have personally used or carefully researched.